When you have an active child at home who loves to be creative and a construction worker (seemingly at the same time), finding a space that can engage and entertain them is important. Especially indoors where in the Pacific Northwest we see some wet winters.
That’s why we converted this IKEA Changing Table into a Craft Bench as part of the Parents Magazine Blogger Decorating Challenge.
This project was fun, easy, and has already provided hours of enjoyment for our son. With another baby due in June, this bench will live on for many years as a great way to help them and friends create and build together.
Instructions:
1. Assemble Gulliver changing pad shelves as instructed. Set top shelf aside.
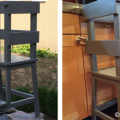
Changing table fully assembled
Set top shelf rails (IKEA step 13) aside and save (you’ll use them later).
2. Lay side piece with poles (IKEA step 10) on ground. At the top, measure 15” from the front (use IKEA instructions to determine front & back) and mark it.
3. Using handheld saw, cut down that line
4. Using handheld saw, cut front side post flush with top of middle shelf
5. Using handheld saw, remove first 4 posts flush with top of middle shelf. Discard portion you’ve removed.
6. Gently sand area where posts were removed.
Repeat steps 3-7 with second side piece.
7. Using one of two saved top shelf rails (step 2), measure six 4” pieces and one 7” piece.
8. Then use handsaw to cut pieces.
9. Lightly sand the back of each piece for better adhesion.
10. Place glue on sanded side of each piece.
11. Place each piece around promoter of top shelf, with long piece down the center.
12. Cut pegboard to fit 30 1/2” x 19” to fit inside top shelf opening. (Many home improvement stores can do this for you)
13. Spray paint pegboard desired color
14. Assemble sides and bottom two shelves as instructed
15. Measure width of table
16. Using handheld saw, cut remaining top shelf rail piece to size
17. Measure 6 1/2” from back of middle shelf and place top shelf rail piece in place. Trace line against back.
18. Add glue to bottom portion of top shelf rail piece
19. Place back piece against line. Using screw gun or screwdriver add three 1 1/4” screws to top shelf rail piece to secure (NOTE: wood is very soft so it is easy to use screwdriver if no screw gun available)
20. Place top shelf flush with cut ends. Screw two 1 1/14” screws into each side and three across bottom to secure top shelf vertically
21. Using five to seven 1” cabinet screws, secure pegboard to cut pieces on top shelf
22. Decorate
Bonus: Add two hooks on inside to hang string for a roll of craft paper.
Supply List:
Pegboard - Home Depot - $7.97
Spray Paint - Home Depot - $3.87
1 1/4” Screws - Home Depot - $1.94
1” Cabinet screws - Home Depot- $4.59
Gorilla Glue - Home Depot - $4.97
Sanding Block - Home Depot - $3.97
12” Craft Paper Roll - Michaels - $3.49
Baskets - Dollar Tree - $3.00
________________________________
Total: $33.80
Be sure to check out some of our other DIY projects you can do around the house!
Like what you’ve read? CLICK HERE to subscribe and get it delivered to you!